****You MUST read this Manual before using the map editor! There are necessary instructions for placing trees, water, etc. If you don't follow them, you'll waste A LOT of your time!!
*Also note, there is a mapeditor.ini file that comes with the map editor. You can open that file in a text editor and edit the parameters you'd like to there. Instructions and explainations are in that file.
General Info
Window Size
Saving Maps
Distances
Toolbar
Command Descriptions
Tile Mode
2D/3D Mode
Particle Mode
Light Mode
Height Map
Some necessary info on placing objects:
General
Random Rotation
Height Map
Trees
Ground Mounds
Edges
Wateredges
Roads
Hedge maze
House Insides
Quick Reference Guide to hotkeys & other functions
General Info
Window Size
Do not change the shape of the window to unorthodox sizes, because you might get some nasty
artifacts. As opposed to the game client, the map editor was made that way so you can resize
the window, but don't abuse it.
Saving Maps:
The maps should be in a top directory inside the directory you have the game.
That is, if your game directory is c:\el then the maps should be in c:\el\maps or
c:\el\my_maps and NOT in c:\whatever or c:\el\my_maps\maps_backup .
*All map names should be completely in lower case!*
Do NOT modify the official game maps. The game maps are stored in the \maps directory. If you
modify those maps, Bad Things will happen! If you want to play with them, make a copy first,
and play only with that copy. Preferably, put those copies in a new directory.
Distances:
The coordinates used in EL are in meters. If you don't know the metric system, learn it. It is
the international standard after all.
The smallest coordinate (for walkability) is 50 CM. Each height tile step goes up 20cm. Each ground tile is 3x3 meters.
Toolbar:
As you can see in the menu, there are a few modes:
1st- ground tile mode.
2nd- 2D objects mode.
3rd- 3D objects mode.
4th- Particle mode.
5th- lights mode.
6th- height map mode.
7th- settings button.
8th- "Select" object/tile/light/height under mouse.
9th- clone object.
10th- New object.
11th- Kill button.
12th- Save Map.
13th- Load Map.
14th- New map.
Command Description:
Basically, by clicking on a mode (1-5) that mode becomes the current mode, so all the things
you do (like add, clone, new, kill, an object) will only affect the objects in that mode.
That is, if your current mode is Tile mode, you can't add 3D objects, only tiles.
Right click on a mode icon, will make the layer corresponding to that mode dissapear, unless
it is the current mode, in which case it is still visible.
For instance, if you're in 3D mode, and you need to see the height map, just right click on the height map icon, and it will enable the height map. Right click on that mode again, and you will disable it. You can also disable/enable the 3D/2D objects by the same means.
Ground Tile mode:
-To add a new ground tile: Click on the ground tile icon, then click the new object icon. A window will all the tiles available will appear. There can be more ground tiles than what you see on the screen, so use the + and - keys on the Num keypad to scroll up/down(there can be up to 256 ground tiles). If you scroll all the way to the end, there are some special water tiles.
-Each tile is 3meters(use this guide if you want to make 2D/3D objects)
-First tile is the lake tile. Using it you will generate water. Keep in mind that water is lower
than the ground (25 cm). There are a few other water tiles which can be found by pressing + or - on the NUM Keyboard(so make sure you have Num Lock on!).
Please note however, Tile 231 should NOT be placed anywhere! It is just the texture for the water for the cave maps, and will automatically be placed there when you use the regular water tile.
The rest of the tiles are whatever they look like.
-When you select the KILL action, and you KILL tiles, that sets them to the NULL tile.
The NULL tile won't be displayed in the game, so it should be used in places where the ground is obscured
by big objects, such as houses, mountains, etc. It is important to use that null tile whenever
possible, because it will make the game faster.
-If you want to put down a lot of tiles quickly, then first select a tile you want to use, then go into the MiniMap mode(M), hold down the right mouse button, and then you can "draw" the tiles wherever you want them. It puts down 16 tiles with one click. You also "draw" the tiles without being in minimap mode, but it will only place 1 tile at a time.
-Use the BLACK tile to hide objects in inside maps that stick through the ground. You don't want them to be visible, so this black tile covers them up. If you have trouble finding the black ground tile, it is the 5th row down, last column.
-If you need to higher/lower the ground tiles, or rotate them, you can use the 3d ground tiles. When you go into 3d mode, look in the tiles folder, their numbers correspond to the numbers of the real ground tiles. There is also a 3d Black tile, it is Tile39.
2D/3D mode:
-To Add a new 2d OR 3d object: Click on the respective icon(2D or 3D), then click on the New Object icon. This will open up the file directory where you can choose which object you want to put in the map. You can ONLY open 2D objects when you're in 2D obj. mode. Same with 3D.
-CTRL + arrow keys rotate the object.
-Holding down the shift key will give you greater accuracy.
-Insert/Delete rises, respectively lowers the object. For more accuracy, hold down shift.
Special 2D objects settings:
-Hold down CTRL while placing 2D objects to RANDOMLY ROTATE and alternate the heights of the objects. This
is extremly useful when you need to place many 2d objects near or around each other. It is not a fool-proof
way to prevent "flickering" however, so you still have to manually check that by rotating the camera slowly(shift+home/end).
Special 3D objects settings:
-Ctrl+b -press this to bring up a window with categories of objects to select from. You can view the objects as thumbnails, making it a lot easier to use than the normal file browser.
-Pressing the 'B' key, while having a selected object, will make that object BLENDED with the
background. It makes it kind of glow and can be cool to use on things such as crystals. You can press
the number keys 1, 2, 3 to increase the Red, Green, or Blue values of the blended object. Holding down ALT
while pressing 1, 2, or 3 DECREASES the RGB values.
-Pressing L will make the object be Self Lit. This is usually usefull for things such as light
sources. However, note that the Self Lit objects will NOT become self lit in the daytime, only
in the evening-night-morning.
With the number keys 1, 2, and 3 you can change (increase) the R, G and respectively B intensity of that self lit
object. Notice that, by default, RGB=0, so the object is very dark. By holding down ALT
while pressing 1,2 and 3, you DECREASE the intensity of that color.
Notice that no changes will be visible at day time, so make it night first. Night means around
minute 0 or so.
-Press and hold CTRL down while placing objects will make the 3d object duplicate or "stick" to your mouse
like in the 2d object mode.
-Press ctrl+w to set some random rotatation and height settings for 3d objects. This is useful when you
need to place many default objects like trees, plants, grass, etc. You can enable the rotation for each
axis individually, or a combination or all of them at once. The height you can set the min/max values to as well. To move angles/numbers faster you can use ctrl+leftclick(100 increment) and alt+leftclick(10).
Particle mode:
-Clicking on the New icon after you click the Particle Mode icon will allow you to open a particle to place on the map.
-Press Ctrl+p to open the Particle Editor if you want to try and make a new particle.
-Shift + Right click on Particle mode icon will turn on/off the black boxes
The Editor Interface
**On ANY + or - button you can:
-Click with mouse alone go up increments of 0.01
-Click with mouse AND hold down shift: increments of 0.10
-Click with mouse AND hold down ctrl: increments of 1.0
System types:
0 Teleporter. "Acceleration" is used as a random modifier to speed each fram. Particles die when at z is greater than 2.0
1 Teleport in or out. Acceleration used as for teleporter. Particles die at z is greater than 2.0... Now that I think of it, this should probably not be used (the update function is almost identical to the teleporter one.)
2 Bag in or out. Acceleration used as for teleporter. Particles die at z is greater than 1.0
3 Spherical or circular burst. Set velocity to zero to make it be calculated by position. If particle has one coordinate set to zero, the burst will be circular, otherwise spherical. Particles die when at a distance of 3 times the constrain radius from the system center.
4 Fire (or smoke etc.) Acceleration used as for teleporter. Particles die when alpha is less than 0.0
5 Fountain. Particles will bounce if they go under z=0 (the ground plane) and die when alpha is less than 0.0
Blending Modes
These are used to combine the particle (source) with what's been rendered before (destination.) The final color for each pixel is sblend*scolor+dblend*dcolor (where sblend is the source blending factor and so on.) You can ignore GL_SRC_ALPHA_SATURATE and anything involving DST_ALPHA, since we don't (necessarily) have an alpha channel.
Source (first value):
[CODE]GL_ZERO 0x0
GL_ONE 0x1
GL_DST_COLOR 0x0306
GL_ONE_MINUS_DST_COLOR 0x0307
GL_SRC_ALPHA_SATURATE 0x0308
GL_SRC_ALPHA 0x0302
GL_ONE_MINUS_SRC_ALPHA 0x0303
GL_DST_ALPHA 0x0304
GL_ONE_MINUS_DST_ALPHA 0x0305[/CODE]
Destination (second value):
[CODE]GL_ZERO 0x0
GL_ONE 0x1
GL_SRC_COLOR 0x0300
GL_ONE_MINUS_SRC_COLOR 0x0301
GL_SRC_ALPHA 0x0302
GL_ONE_MINUS_SRC_ALPHA 0x0303
GL_DST_ALPHA 0x0304
GL_ONE_MINUS_DST_ALPHA 0x0305[/CODE]
#particles
-How many particles will be displayed in total.
TTL-Time To Live
Not used when less than zero.
The system dies when all particles are free and ttl is zero (it's decremented when particles are updated.)
RND-Random function
Random function used when creating particles. I'd prefer it if you used 0 here, but if you feel that 1 looks better, then go ahead and use it.
0 - Linear distribution between min and max
1 - Other kind of distribution (from the old system.) Most values should be between min and max...
Particles size & min max RGB values
-R=red, G=green, B=blue, A=alpha (or transparency). These are the different colors you can make the particles. The ones with d in front are the Destination particles, so the colors that the Source colors get changed into as they move.
Display:
-You can Zoom in/out of the window display by pressing pageup/down or middle mouse button, and also rotate by pressing home/end
-Click on the Display button to see all options listed below!!
Texture
-You can click on the + or - to see different particle textures you can use. Currently there is just a circle and a star type.
Start Position
-Changes the X, Y, Z orientation of where the particle starts on it's axis
Constraint
-Defines the radius of the particles.
-Not used when less than zero.Created particles are constrained to be so that x*x+y*y is less than constraint, i.e. the constrain is the square of the radius.
Start Velocity
-Changes the velocity of the particles.
Acceleration
-Changes the acceleration of the particles.
Lights
-Attaches a light to your particles.
Open & Saving
-Click the open folder icon to open a particle file for editing.
-Click the save icon to save your newly made particle!**You MUST save the particle in order to use it!!**
Light Mode:
-The Lights can be only rised/lowered, with Ins/Del (keep shift pressed for accuracy).
-Lights are represented as colored cubes. The lights are visible only at night, they are turned
off at daytime (except if the map is set as a Dungeon).
-You can increase the lights intensity by pressing 1,2, and 3, and decrease it with Alt+1, 2 or 3.
-The intensity range is from 0 to 5.
-The range of each lights is 30 meters (a height tile is half a meter, a normal tile is 3
meters). It is IMPORTANT that at any place in the game there won't be more than 7 visible lights
at a time. Otherwise, there will be some nasty artifacts.
Also, try to avoid as much as possible setting a light intensity over 3. That is, try NOT to
have any of the R G B components above 3.
Height Map:
Basically, the height map has 2 purposes:
1. To not let players go through certain areas (like, say, going through a tree, house, rock,
water, etc.).
2. Provide an elevation map.
The elevation map is usefull when you want someone who walks on an object to be a little
displaced from the ground. For example, when you walk over a bridge, if the elevation map is
left unchanged (the default is the ground value), then your feet will go inside the bridge.
-The heights are in the range of -2.20 M to 4 M. -2.20 M is reserved for 'unwalkable'
All the rest can be used to specify how much you want the player to be displaced from the
ground, while he/she/it is on that tile. The default height is 0 M. The heights increase
with 20 CM each step.
-With Ins/Del you can navigate through all the heights.
-Tab switches the 2d/3d display mode of the heights. By default, all the height tiles are
displayed on the ground, the only indication of how tall they are is given by their color.
If you press TAB, you can display them in the 3D mode, so the height tiles will be displayed
at their real heights. This is usually usefull for bridges, rocks, etc.
-You can put more than one tile down at a time, by holding down the alt(49 tiles), ctrl(9 tiles) key, or alt+ctrl(121 tiles). This is useful for big objects.
-Shift+clicking when a height map tile is under your mouse cursor acts as a "paint bucket fill". It will fill in all similar adjacent height tiles. This is good for filling in very large areas.
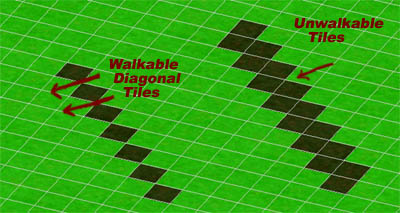
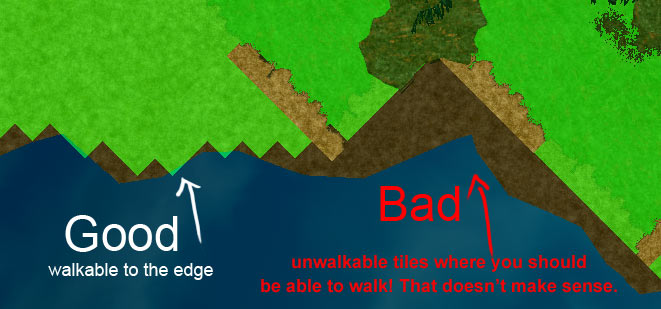
**Very important note!- in this game, you can walk on diagonal tiles. As shown in the picture. So if you're making a fence, that you don't want someone to walk through, and the fence is set on tiles diagonally, you must make it so there are no "walkable height tile corners" touching each other!
***Also very important!- You MUST place unwalkable tiles EVERYWHERE that you cannot walk! Such as underneath mountains, in the middle of the ocean, everywhere! The reason for this is because we do not want monsters to spawn inside mountains, or in areas of the map where you cannot walk, where there is nothing. The entire map MUST be full of height map tiles at the correct height! If you make a map, and you only fill half of the map, the other half MUST be filled with unwalkable tiles!
Some necessary info on placing objects:
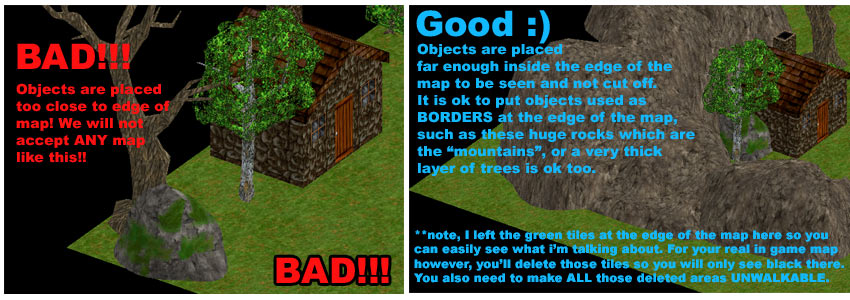
General: ALL objects MUST be placed at least 1 full ground tile away from the very edges of the map! This is because you cannot fully view those objects(they get cut off at the edge). Important objects should be placed even further inside the map.
--BAD picture:Objects are placed too close to edge of map! We will NOT accept any map like this!!
--GOOD picture:Objects are placed far enough inside the edge of the map to be seen and not cut off. It is ok to put objects used as BORDERS at the edge of the map, such as these huge rocks which are
the "mountains", or a very thick layer of trees or some other things are ok too.
**note, I left the green tiles at the edge of the map here so you can easily see what i�m talking about. For your real in game map however, you�ll delete those tiles so you will only see black there. You also need to make ALL those deleted areas UNWALKABLE.
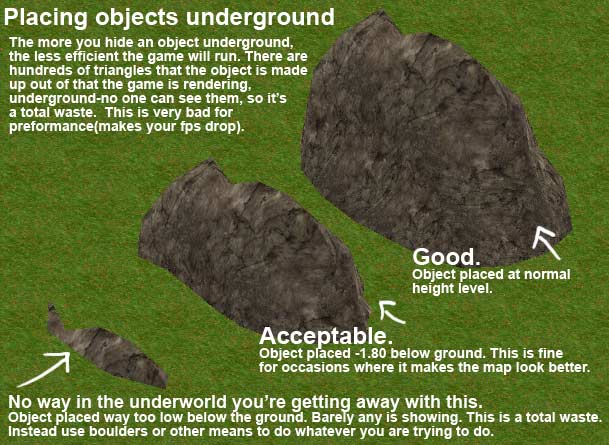
Placing Objects Underground: Should ONLY be done when it really has a good impact on the map. Otherwise you are wasting resources. These 3d objects are made up out of hundreds of triangles that get rendered by the client engine. They will get rendered whether or not they are underground. So the more you place, the slower the game will be.
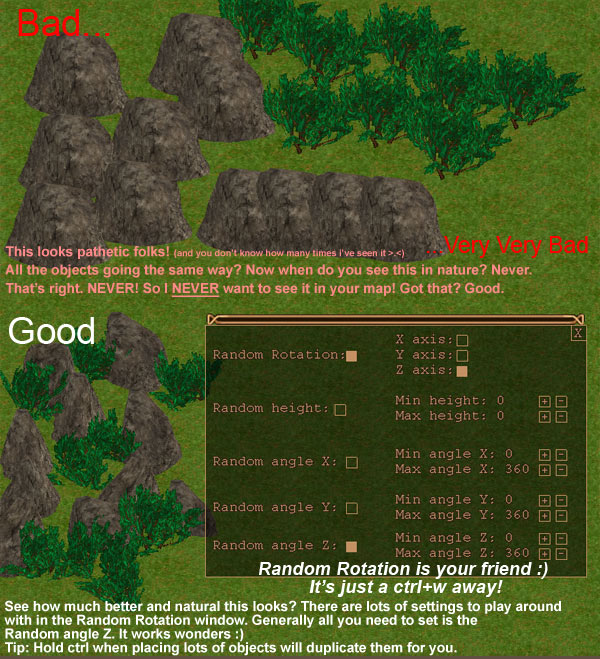
Random Rotation:This is VERY important to use on objects that are close to each other on the map, or objects that act as a border(mountains or boulders for instance). Press ctrl+w to bring up the random rotation screen.
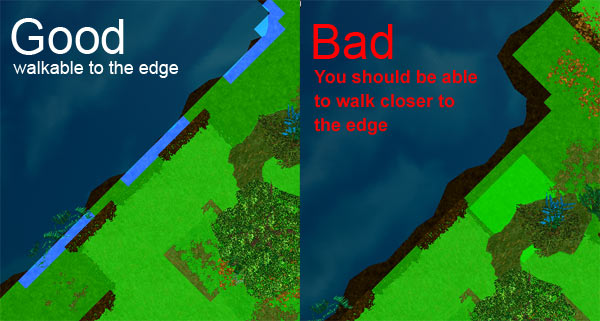
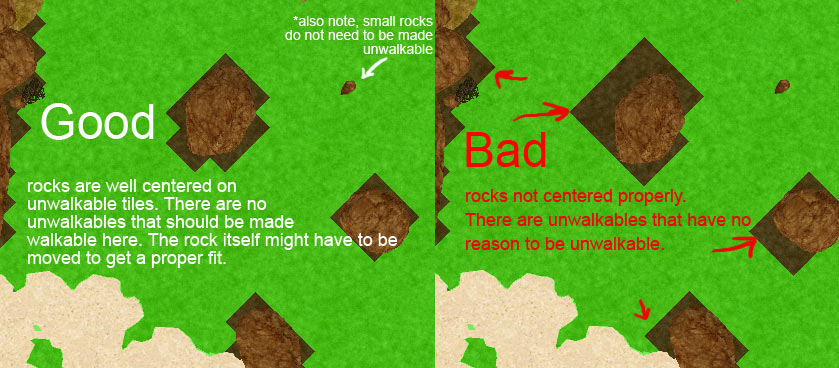
Height mapping:When you make your height map, always remember "less is more". The less tiles that are unwalkable, the better the experience is for the player. If it looks like you should be able to walk somewhere, then it should not be unwalkable! It is very frustrating as a player trying to click somewhere and you can't go there. Make the height map minimal. Here are examples:
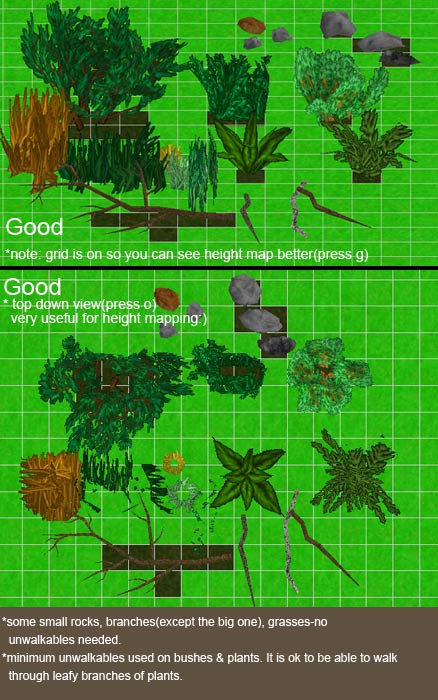
Trees: randomly rotate them to get as much a variety as possbile. And don't get too carried away with placing LOTS of trees with leaves, or plants near water, or in general. Why is this? Because the leaves have a transparency on them, and it makes the game slower, we don't want it to be too slow. So watch your FPS. Of course if you have a fast machine, then it will be no problem for you, but keep in mind the people that don't.
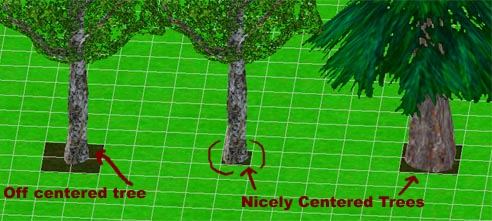
Also...when placing the trees USE THE GRID!!!(G on the keyboard). You need this so that you can accurately place objects for the height map. For instance, with "tree1", this tree only takes up one tile on the grid. So you place it in the center of that tile. Otherwise if you just place them randomly, you'll have a lot of work later on when placing the height map, because you'll have to center the trees, etc. (I know it is, it happened to me, that's why using the grid is NECESSARY, unless you like to make more work for youself)
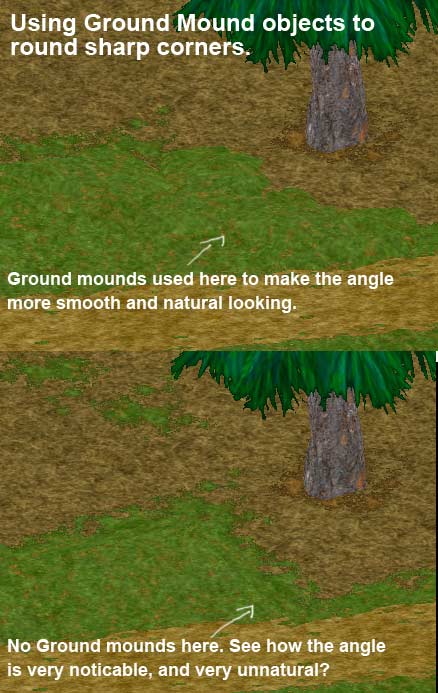
Ground Mounds: are very useful objects, especially to make corners look more natural. Here are some examples that you should follow with regards to edges between 2 different types of tiles, or water:
2D Edges, Spots of grass/dirt/etc (and some 3D objects): -You MUST alternate the height when you overlap the 2D/3D objects!!: grass edges, dirt, leaves, etc... or flickering will happen. They are by default at .00 Do not place them higher than .03, as it's really not needed (Do this by holding down the shift key+Ins or Del to move the objects up and down with one cm increments).
-Also note that you can use Ground Mound 3d objects for the edges along with 2d objects. This gives more of a variety, makes things easier, and altogether looks better.
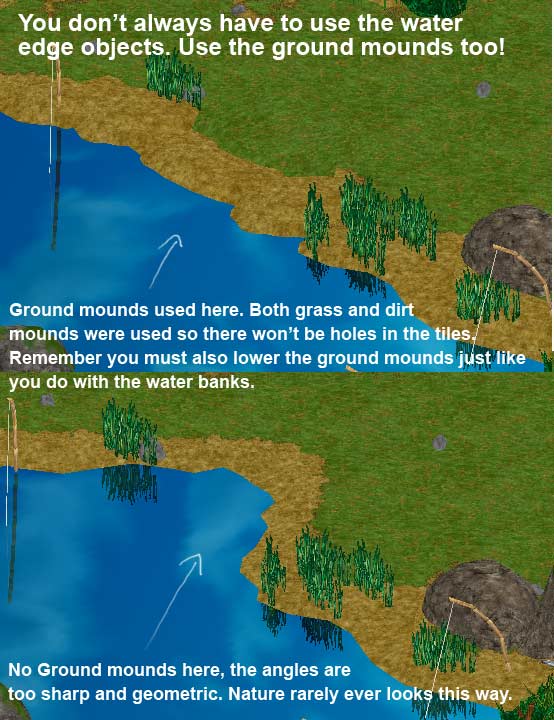
Wateredges:when you put the water edges in place, they must be .23 below ground level. Except for "wateredge1.e3d" which you should put at .24 (just use the delete key to make them go to .20, then shift+delete to get that accurate .23cm level).
-Also, at times a few edges might not line up properly. You can just place a rock, ground mounds, or some
tall grass over the area to conceal it. But try to make them line up as good as possible. We don't want to see 3 million rocks all over the edges.
-In addition, using the ground mounds is a good way to vary the water edges. So put some of them in there too.
Roads: must be placed .01 or .02 above ground. Alternate when you overlap them, or
flickering will happen.
Hedgemaze:if you want to make a maze, you MUST place the hedge .01 above
ground(just one step), or there will be some nasty flickering when you turn the camera slowly.
**To see "flickering" between objects on the map, just rotate the camera slowly
by holding the shift key as you rotate. Or, when you have an object selected(for instance a road), you can move it with your mouse over other roads, and if you see weird flickering, that means it's at the same height as the other road(and you have to make it 1cm lower, or higher to not have the flickering).
House Insides
- To place these, you'll need to start a new map that will be used ONLY for the insides. The size of the map depends on how many houses you'll have, and which houses(as they vary in sizes). BEFORE you start a new map, calculate the size that you will need, so you don't use a HUGE map for like only 4 houses.
A small house(such as insidehouse1.e3d) takes up 2x2 GT(ground tiles). Every house needs at least 4 ground tiles inbetween each other on all sides(so that you will not overhear others speaking in another house). This also includes the edge of the map! Make sure you have 2 GT space BEFORE the edge of the map! So, add 4 tiles(2 tiles on each side) onto each house size to create a buffer zone. That small house area that was 2x2 GT is now 6x6 GT.
*Don't Null the Ground Tiles unlil you have finished placing the houses, as the GT's are how you will measure the areas and place your houses. Except for the tiles Underneath the houses(as the floor of the house will flicker and that can get annoying)
Here are the TOTAL areas(the house itself plus the "buffer zone") that the house insides take up on the map:
Houses 1-5,10,11,14,15,16,18,house9_small, room1, and Treehouses*......6x6 GT
Houses 9,17, and the Temple.......7x7
Houses 12,13......7x6
Building1, house9_big .....8x8
hallway1.....5x7
*With the treehouses, the "roots" will go outside the 2x2 area. However you can't walk in those roots anyway, so you're not missing anything.
**When you place the inside of a house that already has a door attached to it by default, you must find the same door object and put it in front of that door. This extra door will be used as the objected you click on to leave the house.
Quick Key Guide
Global keys:
**These keys are CASE SENSITIVE- so make sure you have your caps OFF!
Escape - quits the program, no confirmation, no save.
Alt+s -turns the shadows on/off. Default is off.
F1 -increases the time of the day with one minute.
F2 -decreases it.
F12-puts you at the MAX zoom for the actual game
Arrow keys -move the camera.
Home/End -rotate the camera.
pageup/pagedown -zooms in/out
Shift+ home/end -rotates the camera more slowly for greater accuracy.
Right click a "mode" -disables/enables that mode.
g -turns a grid on/off.Press + or - on the Numpad to higher & lower the grid.
m -minimap mode. Press m, then just left click to take yourself to any spot on the map you want.
n -night, sets the time to the darkest part of the night.
d -day, sets the time to the lightest part of the day.
o -top down view
ctrl+r -replace mode. Using this function you can take a groundtile, 2d, 3d object, or particle and globally replace it with another(all the occurances of that specific object in the entire map). Mode 1 is for ground tiles, Mode 2 is 2d objects, Mode 3 is 3d objects, Mode 4 is particles. To use this function, you must first choose which mode you want to be in, then click to pick up the object you want to replace. With the object still under your mouse cursor, press the Select button next to the word "original", and a number will show up. Then, release that object and pick up the object you want to replace it with and press the Select button next to "New". Then, hit the Replace button.
ctrl+e -alternate edit mode. Using this function you can edit the attributes of an object without picking up the object with the mouse. First press ctrl+e, a blank window box will appear. Next, click the icon-mode of the object you want to edit. Then ALT+leftclick on the object. The attributes will appear in the window-box, which you can edit. Left click on the + or - box to advance the attribute numbers by 1. Holding down ctrl while clicking will make it advance by 100, holding alt will advance it by 10, shift will advance it by 0.10, and alt+shift by 0.01.
3D/2D object keys:
ctrl+b - opens the 3D object thumbnail browser.
ctrl+arrow keys -rotates the object on X and Z axis
ctrl+pageup/pagedown-rotates the object on the Y axis
ins/delete -move the object up/down by 10cm
shift+ins/delete- move the object up/down by 1cm(for more accuracy)
right click- when you have an object selected, right clicking will delete it
ctrl+w -you can enable some random rotation & height settings for 3D objects.
ctrl -hold this down when placing 3D objects to "stick" them to the mouse
alt -hold this down when placing 2D objects and they will randomly rotate and change heights.
Particle keys:
Ctrl+p open particle editor
--On ANY + or - button you can:
-Click with mouse alone go up increments of 0.01
-Click with mouse AND hold down shift: increments of 0.10
-Click with mouse AND hold down ctrl: increments of 1.0
Shift + Right click on Particle mode icon will turn on/off the black boxes
Light keys:
ins/delete-(same as functions as mentioned above)
1, 2, 3 -increase RGB values
alt+ 1/2/3 -decrease RGB values
Height Map keys:
Tab-shows the Height in "3d" mode
ctrl- puts down 9 squares instead of one.(while you have a square selected)
alt- puts down 49 squares
alt+ctrl- puts down 121 squares
Shift+clicking- when a height map tile is under your mouse cursor this acts as a "paint bucket fill".
Tile mode keys:
*you CANNOT rotate, or adjust the height of a tile
Putting many tiles down at once: first, select a tile you want to put down. Then, without deselecting that tile, go into the minimap mode. Then hold down the right mouse button, and you can "draw" the tiles. This also works in the regular map mode.
***I think I covered everything here, but if you have any problems, post it on the forums.